其实很久没有写Gnome Extension了(不把Linux作为主系统了), 当时因为fcitx(其实是chromium系)的bug导致输入框位置HiDpi下偏移, 所以想写个插件临时弥补一下. 判别focus window当然首先想到的是用xprop, 需要执行一段system command. 网上找了很久才找到的解决方案, 这里转来分享一下, 万一以后要用. 不过很多需要命令操控GTK/Gnome的都可以直接使用内建的API, 不想找官方麻烦的doc(可以看C的API再用)的往往可以从类似扩展中找到.
现在开始复制
The scope of this post is to demonstrate (not a tutorial) how easily and quickly we can create a useful application in GNOME, by calling external programs/commands. Nop, we don’t need any (maybe some!) programming skills to have something up and running in a matter of minutes.
So I wrote an application that can start and stop firewalld service with three different ways. From a CLI (almost CLI), from a GTK Window and from a Clutter Window.
We can’t start/stop firewall (in Fedora at least) from a UI (there is systemd UI), but only from command line
$ sudo systemctl start/stop/enable/disable firewalld
From an -almost- CLI
The time I spend on this was around 15mins ..plus an hour to understand that I couldn’t make
myFirewall
#!/bin/gjs

const GLib = imports.gi.GLib;

// A JSON Object that keeps strings -
//Useful for creating settings
var myConfig = {
	start : "pkexec systemctl start firewalld",
	stop : "pkexec systemctl stop firewalld"

};

var myFirewall = {

        //Make GLib.spawn_command_line_async prettier
        // "_" indicates a private function
	_spawn_async: function( cmd, e ) {

		try {
			GLib.spawn_command_line_async( cmd, e );
		} catch ( e ) {
			throw e;
		}
	},

        //Make GLib.spawn_command_line_sync prettier
	_spawn_sync: function ( cmd, e) {
		try {
			GLib.spawn_command_line_sync( cmd, null, null, null, e );

		} catch ( e ) {
			throw e;
		}
	},

        // Start and Stop are the functions we call to start/stop firewalld
	start : function () {
		this._spawn_sync(myConfig.start, null);
	},

	stop : function() {
		this._spawn_sync(myConfig.stop, null);
	}

};

// Start terminal Program Here

if (ARGV.length == 0) {

   myFirewall.start();
   print("Start Firewalld\n");
}

else if ((ARGV.length == 1) && (ARGV[0] == "stop")) {
	myFirewall.stop();
    print ("Stop Firewalld\n");

}

else {
	printerr("Wrong arguments!\n")
}
What it does
It uses <g.spawn_command_line_sync> function to spawn a program from command line. I also mention the <g.spawn_command_line_async]> that you might want to use in other case. I could shrink that program in 15 lines, but I extended a bit to show how you can make larger scrips and keep the code tide, or writing plugins for a namespace etc.
How to use it
Start Firewalld
$ myFirewall
Stop Firewalld
$ myFirewall stop
Install
First you need to make those scripts executable. From Nautilus, right click-> Properties -> Permissions-> Allow Executing File as Program.
Or from terminal
chmod +x myFirewall
A nice location to place these kind of scripts is inside the <~/.local/bin> directory. Then you should add it to the path
Open <~/.bashrc> and add
PATH=$PATH:~/.local/bin
From GTK
In this case I just copied and slight modified the example from GNOME Developer. Time? Less than 10 mins!
myFirewall-gtk
#!/usr/bin/gjs

const Gtk = imports.gi.Gtk;
const Gio = imports.gi.Gio;
const GLib = imports.gi.GLib;
const Lang = imports.lang;

var myConfig = {
    start : "pkexec systemctl start firewalld",
    stop : "pkexec systemctl stop firewalld"

};

var myFirewall = {

    _spawn_async: function( cmd, e ) {

        try {
            GLib.spawn_command_line_async( cmd, e );
        } catch ( e ) {
            throw e;
        }
    },

    _spawn_sync: function ( cmd, e) {
        try {
            GLib.spawn_command_line_sync( cmd, null, null, null, e );

        } catch ( e ) {
            throw e;
        }
    },

    start : function () {
        this._spawn_sync(myConfig.start, null);
    },

    stop : function() {
        this._spawn_sync(myConfig.stop, null);
    }

};

const FirewalldApp = new Lang.Class({
    Name: 'Firewalld App',

    // Create the application itself
    _init: function() {
        this.application = new Gtk.Application();

        // Connect 'activate' and 'startup' signals to the callback functions
        this.application.connect('activate', Lang.bind(this, this._onActivate));
        this.application.connect('startup', Lang.bind(this, this._onStartup));
    },

    // Callback function for 'activate' signal presents window when active
    _onActivate: function() {
        this._window.present();
    },

    // Callback function for 'startup' signal builds the UI
    _onStartup: function() {
        this._buildUI ();
    },

    // Build the application's UI
    _buildUI: function() {

        // Create the application window
        this._window = new Gtk.ApplicationWindow({
            application: this.application,
            window_position: Gtk.WindowPosition.CENTER,
            default_height: 200,
            default_width: 400,
            title: "Start / Stop Firewalld"});

        // Create start Button
        this._startButton = new Gtk.Button ({ label: "Start Firewalld" });

        //Bind start Button  to a function
        this._startButton.connect ('clicked', Lang.bind(this, this._startFirewalld));

        // Create stop Button
        this._stopButton = new Gtk.Button ({ label: "Stop Firewall" });

        // Bind it to a function
        this._stopButton.connect("clicked", Lang.bind(this, this._stopFirewalld));

        // Create a status label
        this._firewalldLabel = new Gtk.Label ({
            label: "Status: Unknown"});

        // Create a grid to arrange everything inside
        this._grid = new Gtk.Grid ({
            halign: Gtk.Align.CENTER,
            valign: Gtk.Align.CENTER,
            row_spacing: 20 });

        // Put everything inside the grid
        this._grid.attach (this._startButton, 0, 0, 1, 1);
        this._grid.attach (this._stopButton, 0, 1, 1, 1);
        this._grid.attach (this._firewalldLabel, 0, 1, 1, 5);

        // Add the grid to the window
        this._window.add (this._grid);

        // Show the window and all child widgets
        this._window.show_all();
    },

    // The function to start firewalld
    _stopFirewalld: function () {
        myFirewall.stop();
        this._firewalldLabel.set_label ("Status: Stopped!");
    },

    _startFirewalld: function () {
        myFirewall.start();
        this._firewalldLabel.set_label ("Status: Running!");
    }

});

// Run the application
let app = new FirewalldApp ();
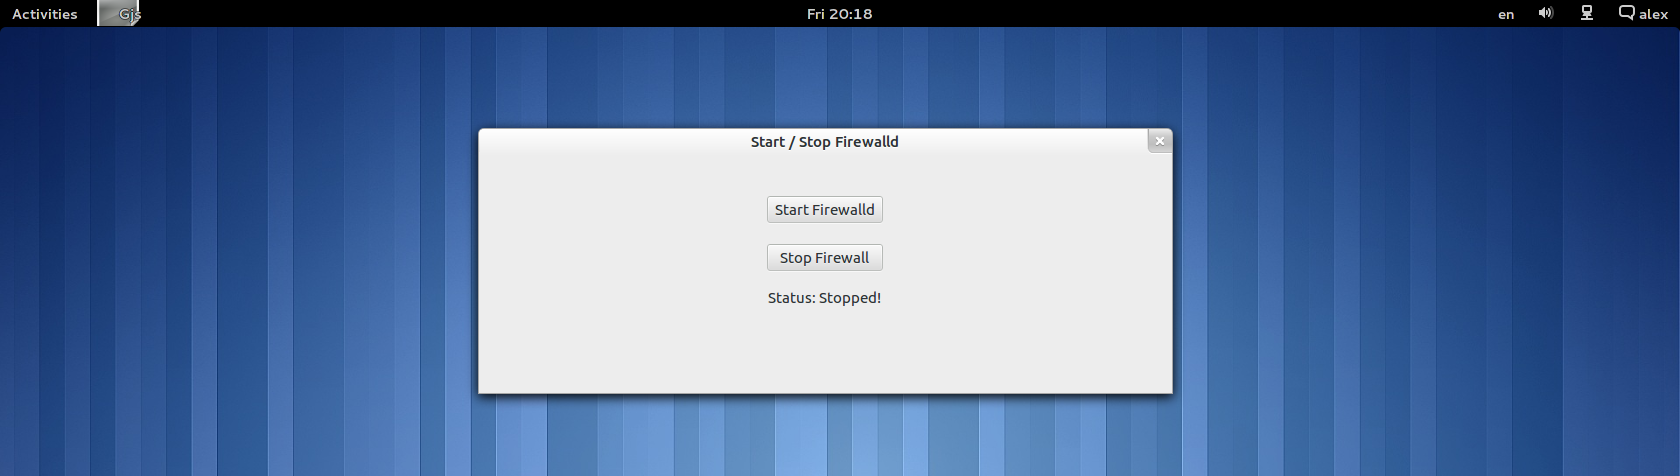
The label just changes when you click an action, and doesn’t really read the status of firewalld
You can create a Desktop File and launch such small scripts from Shell App Overview.
From Clutter
That was shortest one. I used some older demos I had wrote and edit a couple of lines, in about 3 mins ;)
myFirewall-clutter
#!/usr/bin/gjs

//Import Clutter
const Clutter = imports.gi.Clutter;
const GLib = imports.gi.GLib;

var myConfig = {
    start : "pkexec systemctl start firewalld",
    stop : "pkexec systemctl stop firewalld"

};

var myFirewall = {

    _spawn_async: function( cmd, e ) {

        try {
            GLib.spawn_command_line_async( cmd, e );
        } catch ( e ) {
            throw e;
        }
    },

    _spawn_sync: function ( cmd, e) {
        try {
            GLib.spawn_command_line_sync( cmd, null, null, null, e );

        } catch ( e ) {
            throw e;
        }
    },

    start : function () {
        this._spawn_sync(myConfig.start, null);
    },

    stop : function() {
        this._spawn_sync(myConfig.stop, null);
    }

};

//Initialize Clutter
Clutter.init (null, 0);

//Create some colors from Clutter Color pattern
let stage_bg_color = Clutter.Color.get_static(Clutter.StaticColor.GRAY);
let actor_bg_color_green = Clutter.Color.get_static(Clutter.StaticColor.GREEN);
let actor_bg_color_red = Clutter.Color.get_static(Clutter.StaticColor.RED);

//Some constants for sizes
const Size_Large = 300;
const Size_Small = 50;

//Create a custom color
//let black = new Clutter.Color( {red:0, blue:0, green:0, alpha:255} );

//Create Stage
let stage = Clutter.Stage.get_default();

//Some Stage Options
stage.set_size(Size_Large, Size_Large);
stage.title = "Start Stop Firewalld";
stage.set_background_color(stage_bg_color);

//Create start firewall actor
let startActor = new Clutter.Actor();

//Actor Options
startActor.set_position(20,20);
startActor.set_size(Size_Small,Size_Small);
startActor.set_background_color(actor_bg_color_green);

//Set actore re-active on events
startActor.set_reactive(true);

//Create stop firewall actor
let stopActor = new Clutter.Actor();

//Actor Options
stopActor.set_position(90,20);
stopActor.set_size(Size_Small,Size_Small);
stopActor.set_background_color(actor_bg_color_red);

//Set actore re-active on events
stopActor.set_reactive(true);

//Start Firewall
function startFirewalld(stage, event) {
	myFirewall.start();
	print("start firewall");
}

//Stop Function
function stopFirewalld(stage, event) {
	myFirewall.stop();
	print("stop firewall");
}

//Add the signal to startActor
startActor.connect("button-press-event", startFirewalld);

//Add the signal to stopActor
stopActor.connect("button-press-event", stopFirewalld);

//Add Actors to the Stage
stage.add_child(startActor);
stage.add_child(stopActor);

//Show the Stage
stage.show();

//Add destroy event on exit
stage.connect("destroy", Clutter.main_quit);

//Start the main Loop
Clutter.main();

Green square starts firewall, Red stops it
In case that you don’t need many widgets for your app, you might want to reconsider to completely -but the Header Menu- write a program in Clutter rather in GTK. Clutter is modern, you have freedom to create custom interfaces, and you can create Views and Actions via JSON descriptions. Which is really really cool and usefull when you have many objects to the stage.
What is impressive is that a guy with my GNOME developing skills (that means none), can build fast something not fancy, but at least working.
While making GNOME Apps with Gjs seems easy, the absent of docs (not even an API docs!) makes it painful. At least since you used to translate the C API to Javascript bindings.
Funny, but I just realized that I wrote an example that will work only in Fedora (systemd + firewalld).. Blame software fragmentation :/
There are two JS Frameworks for GNOME, Gjs and Seed. The most used is Gjs (Shell, GNOME Apps), and you might want to go with this one.
https://wiki.gnome.org/Gjs –> GNOME JavaScript/Spidermonkey bindings
https://wiki.gnome.org/Seed –> GNOME WebKit Javascript bindings